Installation
Copying the repository
To install this application just copy the github repository on your machine. More precisely:
If you use a command-line only linux system:
- change directory to the location you want this application to be. It could go under
/usr/local/bin/for example, or your home directory/home/your_username/. Let’s call this directoryapp_dir/for future reference. - download the zipped file from GitHub, unzip it and delete it:
wget http://github.com/ppt000/mqtt_gateways/archive/master.zip
unzip master.zip
rm master.zip
If you use a window system:
- point your browser to GitHub,
making sure that you are on the
masterbranch of themqtt_gatewaysrepository. - use the Download Zip button or menu from that page to download the zipped file.
- Unzip the file into the location you want this application to be, let’s call it
app_dir.
There is now under app_dir/ a directory called mqtt_gateways_master or something similar.
Inside it, there are all the files needed for the application.
The only non-standard dependency is the paho.mqtt library.
Please install it if you do not have it already in your environment, using pip for example.
The directory structure of the relevant files should look like this:
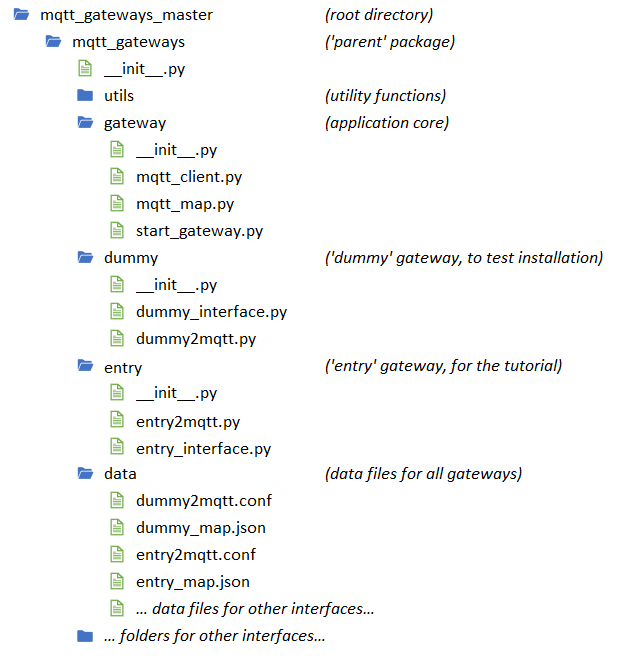
The core engine of the project is the gateway sub-package with
the main module start_gateway.py
that initialises everything and launches the main loop.
The mqtt_map.py module defines a class for internal messages
and a MsgMap class for translation methods between internal
and MQTT messages.
These methods rely on mapping data to be provided by the developer
to be discussed later.
The utils sub-package is a set of utility functions.
The dummy sub-package is the first interface.
It doesn’t do anything except helping to check the set-up
and understand the inner workings of the application.
The data directory contains all the data files for all the interfaces.
These are usually the configuration files and the mapping data files.
Configuration
The configuration file has a standard INI syntax,
with sections identified by [SECTION] and options within sections identified by option=value.
The interface of the gateway can use the [INTERFACE] section
where any number of options can be inserted and will be made available to the application
through a dictionary initialised with all the option:value pairs.
In the case of the dummy gateway the configuration file is just
there to give the address of the MQTT broker.
Edit the dummy2mqtt.conf file in the [MQTT] section:
[MQTT]
host: 127.0.0.1
#port: 1883
The address of the MQTT broker should be provided in the same format
as expected by the paho.mqtt library, usually a raw IP address
(192.168.1.55 for example) if the broker is on your local network,
or an http address (not tested) if your broker is in the cloud.
The default port is 1883, if it is different it can also be indicated
in the configuration file.
Authentication is not available at this stage.
Note
The application is supposed to run in an MQTT enabled environment as the whole idea is to communicate with other devices via MQTT. Therefore there should be a MQTT broker. Ideally the MQTT broker is in the local network, even if a broker in the cloud is acceptable. If you are just testing this application and do not have an MQTT broker, you can use a public one, but the idea is that, down the line, you set up your own local broker.
For more details about the .conf file, defaults and command line arguments,
go to Configuration.
Launch
The application should be launched from the root directory;
in our case it is the first mqtt_gateways directory.
From there, type:
python -m mqtt_gateways.dummy.dummy2mqtt ../data/
The ../data/ argument indicates where the configuration file is.
The application only outputs 1 line to start with:
it indicates the location of the log file.
Thereafter it only outputs errors, if any, so if nothing happens
it is a good sign. More information can be found in the log file,
which in our case is located inside the data directory, as long
as the configuration file has been used as is.
Let the process run a minute or so and check the log file.
It should start with a banner
message to indicate the application has started, then a list of the
full configuration used. Logs from previous runs are kept so make sure
to ‘start from the end’ of the file to read the latest logs.
If the MQTT connection is successful it should say so as well as
displaying the topics to which the application has subscribed.
Thereafter, there should be some DEBUG level logs to indicate
the messages received, if any (there should be none at this stage).
First Run
After the start-up phase, the dummy interface logs (at a DEBUG level) any MQTT messages it receives and emits a unique message every 30 seconds. Start your favourite MQTT monitor app (I use the excellent mqtt-spy). Connect to your MQTT broker and subscribe to the topic:
home/+/dummy/+/+/+/C
You should see the messages arriving every 30 seconds in the MQTT monitor, as well as in the log. Publish now a message from the MQTT monitor:
topic: home/lighting/dummy/office/undefined/me/C
payload: LIGHT_ON
You should see in the log that the message has been received by the gateway, and that it has been processed correctly, meaning that even if it does not do anything, the translation methods have worked.
The mapping data
The mapping data is the link between MQTT and the internal language of the interface.
It maps every keyword in the MQTT vocabulary into the equivalent keyword in the interface.
This mapping is a very simple one-to-one relationship for every keyword, and its use is only
to isolate the internal code from any changes in the MQTT vocabulary.
For the dummy interface, the mapping data is provided by the text file
dummy_map.json in the data folder. It’s just there as a template, as,
once again, the dummy interface really doesn’t do anything.
Note that the map file also contains the topics that the interface should
subscribe to.